
We like having a bench at
the table. And our previous bench was too small and went out on the deck with the table it was built for! You can check that out here...
So I needed to build a new one!!!
I wanted to try and use as much scrap wood as possible. So I totally winged it. Its not a typical build! And I'll give you a link for a more traditional base in case you want that! http://ana-white.com/sites/default/files/simple%20outdoor%20bench%206.jpg
I wanted to mimic the table a little...and give the bench top that chunky "door" look.
So I new I was going to trim it out! I did a lot of research prior to building....thank you pinterest!!! i love you!
I found some cool ideas for legs! I didn't want to use 2x's because it would have looked to chunky with the table! So I decided to use 1x's.

 This is what you will need for your legs! (I know not all the wood is there!)...this is were my reuse of scraps comes in...I ripped down some 1x10 & 1x6 to make some legs! What you see here is just what I bought! Go by what I wrote on the pic! ;)
 Lay down two of your longer pieces (17 1/2"), apply glue to top. Then lay two of your 12 3/8" pieces on and line up with top. Then place one of your 11 1/4" stretchers across both legs making sure to line up both sides flush! Add the bottom 2 5/8" pieces....I then drilled some pilot holes and used 1 1/4" wood screws.
 Now put another layer of glue on and place another one of your 17 1/2" legs on! Your going to sandwich those cut pieces in between your the two solid legs!!! Mmmm sandwich.....anyway!
 Then again with the pilot holes and 1 1/4" screws....pay attention to the screw placement in the pics! That way you don't end up screwing one screw into another!
 This is were more of my scrap wood came into play.... I took and cut 2-2x4's @ 4 1/4", drilled two pocket holes (one going left, one going right) and screwed them into the legs with 2 1/2" wood screws.
 Next I used more of my 2x4 and cut 2-2x4's @ 52 3/8" and attached them with 2 pocket holes in each end (on the top like the 4 1/4" pieces), screws facing into legs! Using 2" screws (For some reason I can't find the pic of this? But you get the idea!...I hope)
 For the bench top I used a 1x12 @ 57". It's a LONG bench!!! Using my Kregjig I drilled all my pocket holes like so 👆....this is how you attach the trim!
 And speaking of trim...you will need 2 - 1x3's @ 12 3/4"(outside) and 11 1/4"(inside) cut on a 45 degree angle. And 2 - 1x3's @ 58 1/2"(outside) and 57"(inside) cut on a 45 degree angle.

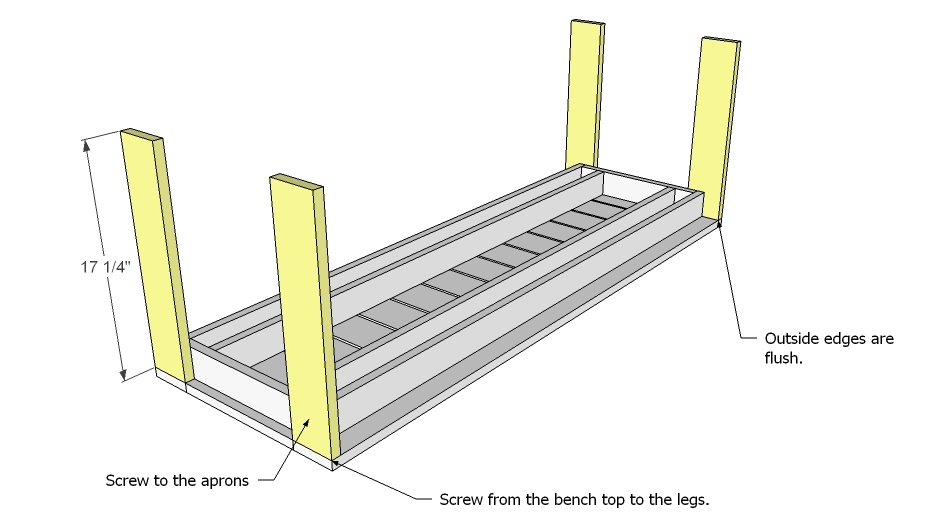
 Now I attached my base to my bench top. I just drilled pilot holes right into the bottom of 2x4's. 5 along the sides and 1 in the smaller pieces. And used 1 1/4" screws to attach. Just make sure your pilot holes are deep enough....but not too deep!
 For the stretcher I used 2 - 1x3's @ 53 1/4". I drilled 4 pilot holes in the side of one, glued them together and attached them using 1 1/4" screws.
 Then drilled two pocket holes in each end and attached my stretcher to the center of the small stretcher on the legs using 1 1/4" screws.
 I used the same finish as I used on the table top!
 Then I painted my base with my Homestead Resort Parlor Taupe!
 Then I gave it a good sanding! On this piece I actually sanded down the ENTIRE top and extra on the edges! I wanted to be able to see the grain! And then I sanded all the edges of the base and distressed the faces of the legs. I used my small black & decker mouse detail sander and 120 grit paper!
 To finish it off I gave it two coats of my all time favorite poly!!!! Rustoleum ultimate Matte!!! It holds up all the craziness in this house!!!! And my fave part....well one of my fave parts is there's NO sanding between coats!!!! Woohoo!!! It's dries so fast and goes on so smooth!!! Super easy!
 This is it!!! I'm so happy with the whole thing!
So I needed to build a new one!!!
I wanted to try and use as much scrap wood as possible. So I totally winged it. Its not a typical build! And I'll give you a link for a more traditional base in case you want that! http://ana-white.com/sites/default/files/simple%20outdoor%20bench%206.jpg
I wanted to mimic the table a little...and give the bench top that chunky "door" look.
I found some cool ideas for legs! I didn't want to use 2x's because it would have looked to chunky with the table! So I decided to use 1x's.
So here's what I did:
I drilled some pocket holes on the inside each end of my longer pieces and used my 1 1/4" screws.
Then attached my top! Also using 1 1/4" screws.
I stained my bench top and applied stain anywhere on the base that I would be distressing!
This is it!!! I'm so happy with the whole thing! The two black chairs are from target. I love them! They are super sturdy and really comfy! http://m.target.com/p/antique-black-dining-chairs-set-of-2/-/A-575148
They come in sets of two for $180. Not bad at all!
Well I hope you enjoyed!!! Happy building!!! Please feel free to ask questions and don't forget to subscribe!!!!
Xoxo Sherri
No comments:
Post a Comment